How to Export WordPress Categories and Tags

How to Export WordPress Categories and Tags

WP All Export automatically detects all categories, tags, and taxonomies tied to the post type you are exporting. This includes WooCommerce product types, brands, real estate locations, and more.

You can choose to export them in one of two ways. First, you can export the taxonomies directly, and get a CSV or XML with category/tag in each row. Or, you can choose to export posts and include the taxonomies attached to them.

Direct Export of WordPress Taxonomies

Export WordPress categories and tags to a custom spreadsheet or XML feed. Here's an example of a simple direct export of WooCommerce product categories:

Category, Description
Winter, Clothing for cold weather.
Summer, Clothing for warm weather.
Mens, Men's clothing.
Womens, Women's clothing.

Export WordPress Posts with Taxonomies

Export any WordPress post type, along with their attached categories. Here's an example of a simple WooCommerce product export with their categories:

Product, Categories
Leather Jacket, Mens|Winter
Fur Coat, Womens|Winter
T-Shirt, Mens|Summer
Halter Top, Womens|Summer

How to Export WooCommerce to CSV or XML

How to Export WooCommerce to CSV or XML

WP All Export exports WooCommerce data to CSV, Excel, or XML. You can export all your WooCommerce products or use filters to select a few. You can also export your WooCommerce orders, or get a list with all your customers.

You can export the existing reviews on your WooCommerce products or the WooCommerce coupons that exist on your site.

WP All Export can also create a Google Merchant Center Product Feed with all your WooCommerce products.

Export WooCommerce Products

Learn how to export WooCommerce products along with their specifications, images, custom fields, etc.

Export WooCommerce Orders

Create a WooCommerce orders report including the product and customer information.

Export WooCommerce Customers

Obtain a list of the customers that have purchased on your site.

Export WooCommerce Reviews

Export existing reviews made on your WooCommerce products.

Export WooCommerce Coupons

Export all data associated with the WooCommerce coupons existing on your site.

Export WooCommerce Products in a Google Merchant Center Product Feed

Export your WooCommerce Products in a friendly format for the Google Merchant Center.

How To Export WooCommerce Reviews to CSV or XML

How To Export WooCommerce Reviews to CSV or XML

To export reviews go to WP All Export › New Export and select WooCommerce Reviews. Next, drag and drop the elements on the right to configure your CSV or XML export file. Then, run the export and download your custom file.

Drag and Drop to Export WooCommerce Reviews

The WooCommerce review data to export is under Available Data. This data is organized into four sections: Review Data, Author Info, Parent, and Other.

Review Data

The fields under Available Data › Review Data contain the most important information about the review:

ID: The review ID, a unique number assigned to all reviews by WordPress.Product ID: The post ID of the reviewed product.Content: The text of the review, written by the author.Rating: The number of stars awarded by the author, a numerical value between 1-5.Approved: Whether the review is approved or not, exports 1 for approved, 0 for unapproved.Verified: The review is verified if the review's author purchased the product, exports 1 for verified reviews, 0 for unverified.Date (Server Time or GMT): The date the review was published, in y-m-d format.

Author Info

Data associated with the author of the review is in Available Data › Author Info.

Author's NameAuthor's EmailAuthor's URLAuthor's IP: The internet protocol address of the author.Agent: Information on which browser the author was using.User ID: The ID of the user account which created the review, exports 0 for guest reviews.

If the review was created by a registered user, all of the author info is pulled from its user account. If the review was done by a guest user, the name and URL is entered manually by the user when submitting the review.

Parent

More information related to the reviewed product is in Available Data › Parent.

Reviews are always attached to a product, which is referred to as the parent product. Reviews can also be the child of another review.

Parent Product Slug: The slug of the reviewed product.Parent Product Title: The title of the reviewed product.Parent Product ID: The post ID of the reviewed product, it's the same as the Product ID under Review Data.Parent Review ID: If this review does not have a parent review, 0 is exported.Parent Review Date (Server Time or GMT): If this review does not have a parent review, nothing is exported.

Other

Other less used data, like Karma, is in Available Data › Other.

How to Export WooCommerce Products to CSV or XML

How to Export WooCommerce Products to CSV or XML

To export your products, go to All Export › New Export and select WooCommerce Products. Next, drag and drop the elements on the right to build your CSV or XML export file. Then, run the export to create your product's export.

Step 1:  Select WooCommerce Products

First, go to All Export › New Export and choose to export WooCommerce Products. Click Customize Export File to continue.

Step 2: Customise Your WooCommerce Products Export File

All data related to your WooCommerce Products is in Available Data section. Drag and drop data elements from right to left to customize your export file.

This data is divided into the following sections: Standard, Product Data, Media, Taxonomies, Custom Fields, and Other.

Standard

Basic WooCommerce Product data is in Available Data › Standard:

ID: The post ID, a unique number given to every post in WordPress.Title: The title or name of the product.Content: A description of the product.Short Description: Similar to the excerpt for posts, usually a summary of the content section.Date: The date the product was published, in y-m-d format.Post Type: The post type being exported, which is product in this case.Permalink: The URL of the product.Parent Product ID: Variable products are attached to a parent product, and this exports the post ID of that parent product (A 0 is exported for products without a parent).

Product Data

More detailed WooCommerce Product data is in Available Data › Product Data:

Sku: A product code used to reference and differentiate products. Price: The product's current price, which is the regular price unless the sale price is active and lower.Regular Price: The regular, full price of the product.Sale Price: The sale price of the product.Stock Status: One of several preset values. The default WooCommerce stock statuses are instock, outofstock, and onbackorder. Stock: The number of products currently in stock and available for sale.External Product URL: The affiliate link for external products.Total Sales: Number of times the product has been sold.Attributes: This will export the attribute's name, value, if it's is used in variations, if it's visible, and if it's a taxonomy or not. This data is more easily exported in the Attributes section.Shipping Class: If configured, it exports the name of the product's shipping class.

If your product has attributes like size or color, they will be automatically detected and added to the Attributes section, at the bottom of Product Data.

Media

Images and file attachments associated with your WooCommerce Products are in Available Data › Media. Images and files are treated the same by WordPress. There are two sections inside the Media section, Images and Attachments. Both contain the same types of fields:

URL: The URL of the file or image.Filename: The filename of the file or full size image.Path: The path, or location on the server of the file or image.ID: The attachment ID of the file or image, similar to a post ID. TitleCaption DescriptionAlt TextFeatured: The URL of the featured image

Taxonomies

The categories and tags that the products are attached to are in Available Data › Taxonomies. By default, there are only two, but all custom taxonomies will be automatically detected and available here.

Product categoriesProduct tags

Custom Fields

Custom fields are in Available Data › Custom Fields. For example, data added to Yoast SEO would appear here.

Other

Other, less used product data is in Available Data › Other. This is an incomplete list, with the more important export fields:

Status: Similar to the post status. The default product statuses are publish, draft, and private.Slug: The database friendy name of the product, used in the product URL.Downloadable: Whether the product is downloadable or not.Downloadable Files: Contains the files for that product if the product is downloadable.Sale Price Dates From: When the sale date starts.Sale Price Dates To: When the sale date ends.Manage Stock: If the product handles stock or not, exports yes or no.Up-SellsCross-SellsTax StatusTax ClassWeightLengthWidthHeight

Step 3: Download Your Exported Products

Once you've configured your product's export as required, click Continue to verify your export settings. Next, click Confirm & Run Export when you're ready to run your export.

After your export is done, download the WooCommerce Product export. You can download the export file directly, or you can download a Bundle. The Bundle contains your exports data and a settings file for WP All Import. Upload the Bundle to WP All Import on another site to quickly import these WooCommerce Products.

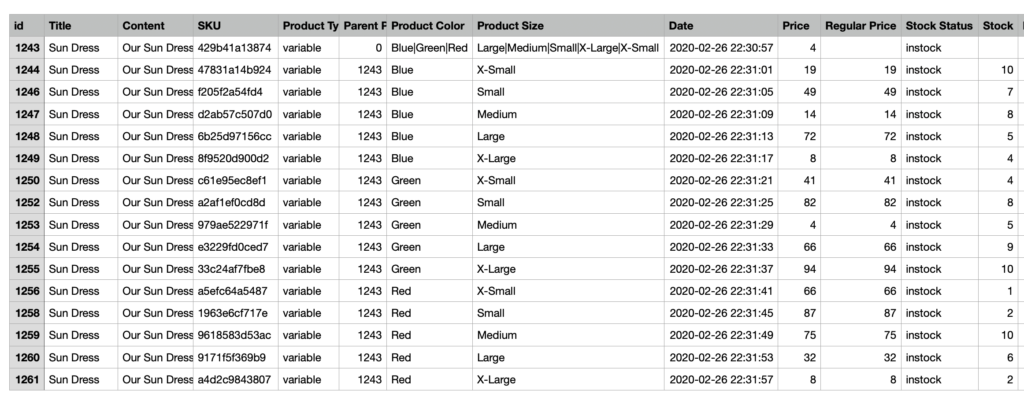
Here's a quick look at a fairly standard WooCommerce product export:
How To Export WooCommerce Customers to CSV or XML

How To Export WooCommerce Customers to CSV or XML

To export your customers, go to WP All Export › New Export and select WooCommerce Customers. Next, drag and drop from the Available Data section to create your export file. Then run the export and download your CSV or XML.

WordPress Users vs WooCommerce Customers

A WooCommerce customer is a specific type of WordPress user.

When someone visits your WooCommerce site and creates a purchase, WooCommerce creates a user account for them. This user account is assigned the role customer, with a set of WooCommerce specific data attached to their account.

Drag and Drop to Export WooCommerce Customer Data

All data tied to WooCommerce customers is in the Available Data section. Drag and drop data elements from right to left to customize your export file.

Exporting WooCommerce Customer Data

WooCommerce customer data is divided into four different sections: Standard, Address, Custom Fields, and Other.

Standard

All basic export fields tied to your WooCommerce customers are in Available Data › Standard. This data is standard for all WordPress user accounts:

ID: Customer ID, which is actually the user ID assigned by WordPressUsername: The username the user chose when creating their accountUser Email: Email address associated with the customer accountFirst Name: Customer's first nameLast Name: Customer's last nameUser Registered: Date when the customer registeredUser Nicename: Sanitized version of the usernameUser URL: Website associated with the customer accountDisplay Name: The name to be displayed publicly, which is selected in WordPress as either the username, first/last, or nicknameNickname: A name chosen by the user to be displayed on the frontendDescription: A description of the user, also labeled as Biographical Info in WordPress

Address

Address fields tied to your WooCommerce customers in Available Data › Address. These address fields are added by WooCommerce and stored in WordPress as custom user meta.

Every customer in WooCommerce has a billing address and a shipping address. Both sets of addresses are organized in the same way:

First NameLast NameCompanyAddress 1Address 2CityPostcodeCountryStateEmailPhone

Custom Fields

Custom fields added to your WooCommerce Customers are in Available Data › Custom Fields. Custom fields are extra information (or metadata) added by your plugins or themes, and they are automatically detected by WP All Export.

For example, WooCommerce adds an "_order_count" custom field which keeps track of how many orders a customer has done.

Other

Other less used export fields tied to your WooCommerce customers are in Available Data › Other.

Exporting WooCommerce Customer Passwords

To export a WooCommerce customer password, include the User Pass export field from Available Data › Other.

These are hashes of the passwords, not the passwords themselves. Hashing is a one-way action that irreversibly scrambles a string of text. It is not possible to reverse the hashing process and reveal the original password. You can, however, import the hashed passwords back into WordPress and customers will be able to log in with their old password.

How To Export WooCommerce Coupons to CSV or XML

How To Export WooCommerce Coupons to CSV or XML

To export WooCommerce coupons, go to WP All Export › New Export and select WooCommerce Coupons. Next, drag and drop to customize your CSV/XML file with your coupon data. Then, run your export and download your file.

Drag and Drop to Export WooCommerce Coupons

Basic coupon data is in Available Data › Standard:

Coupon ID: The coupon ID, assigned by WordPress.Coupon Code: The coupon code itself, used by users to receive the discount.Coupon Description: A description of the coupon, written by the creator of the coupon.Discount Type: One of several preset values. Percentage discounts are exported as percent, fixed cart discounts as fixed_cart, and discounts on specific products as fixed_product.Coupon Amount: The amount to be discounted. Based on the discount type, this is either a percentage or a fixed amount.Expiry Date: Date when the coupon expires and is no longer available, in y-m-d format.Free Shipping: Whether this coupon grants free shipping or not, exports either yes or no. Exclude Sale Items: Whether this coupon works on sale items or not, exports either yes or no.

Other WooCommerce Coupon Data

Less used coupon data is in Available Data › Other. For example, who created the coupon, along with the following fields:

usage_limit: The total number of times the coupon can be used. usage_limit_per_user: The number of times each customer can use the coupon.limit_usage_to_x_items: The maximum number of items allowed in the cart when using the coupon.usage_count: The number of times the coupon has been used.minimum_amount: Minimum cart amount required to apply the coupon.maximum_amount: Maximum cart amount allowed to apply the coupon.

How to Export ACF Fields

How to Export ACF Fields

WP All Export along with the ACF Export Add-On allows you to export data from any Advanced Custom Field(s) present in your post type or custom post type.

The Advanced Custom Fields plugin extends basic custom fields to enable more complex fields, different layouts, and settings. WP All Import has an integration with the ACF plugin to export the information stored in such fields.

Export ACF Text Fields

Export basic ACF text fields such as text area, number, range, email, URL, password, etc.

Export ACF Picker Fields

Export ACF picker fields such as date picker, date time picker, time picker, and color picker.

Export ACF Media Fields

Export ACF media fields such as image, file, oEmbed, gallery, or even a Wysiwyg editor.

Export ACF Choice Fields

Export ACF choice fields such as select, checkbox, radio button, button group, etc.

Export ACF Taxonomy Field

Export ACF taxonomy fields using drag and drop.

Export ACF Google Map Fields

Export ACF google maps fields with the address, latitude, and longitude information.

Export ACF Relational Fields

Export ACF relational fields such as link, post object, page link, relationship, etc.

Export ACF Repeater and Group Fields

Export ACF repeater and group fields easily.

Export ACF Flexible Content Fields

Export ACF flexible content fields.

How to import any CSV/XML to WordPress.

How to import any CSV/XML to WordPress.

Setting up an import for thousands of posts is very similar to manually creating a post. You create a template for your posts that WP All Import uses when importing your data. To set add data from your import file to your import template, you simply drag and drop it.

Step 1: Upload Your File

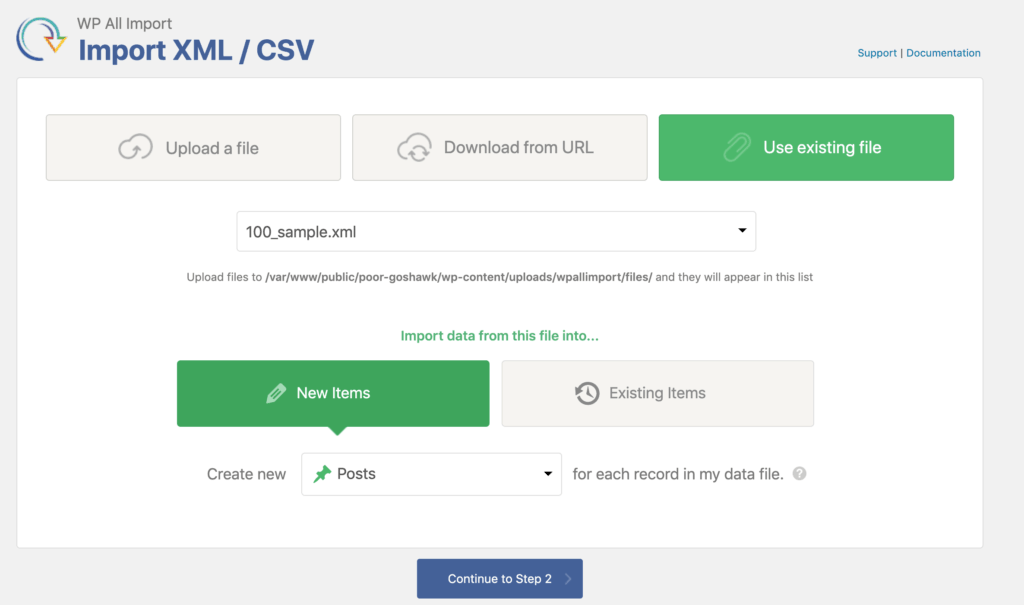
The first step to creating an import is to upload your import file. You can choose to upload the file from your computer, paste in a URL to the file, or choose an existing file that you've already used with WP All Import.

Next, choose either New Items or Existing Items. If you are importing data from your file into posts that are already in your site, select Existing Items. Otherwise, select New Items.

Finally, you need to decide what you want to import. You can import posts, pages, taxonomies, users, or custom post types added by other themes and plugins like WooCommerce products or real estate properties.

Step 2: Review Your Data

WP All Import will process your file and prepare it for import. If you uploaded a CSV, check that the correct delimiter was used. If you uploaded an XML file, check that the correct node was selected.

If you only want to import some of the records in your import file you can add filter rules.

Step 3: Configure Your Import

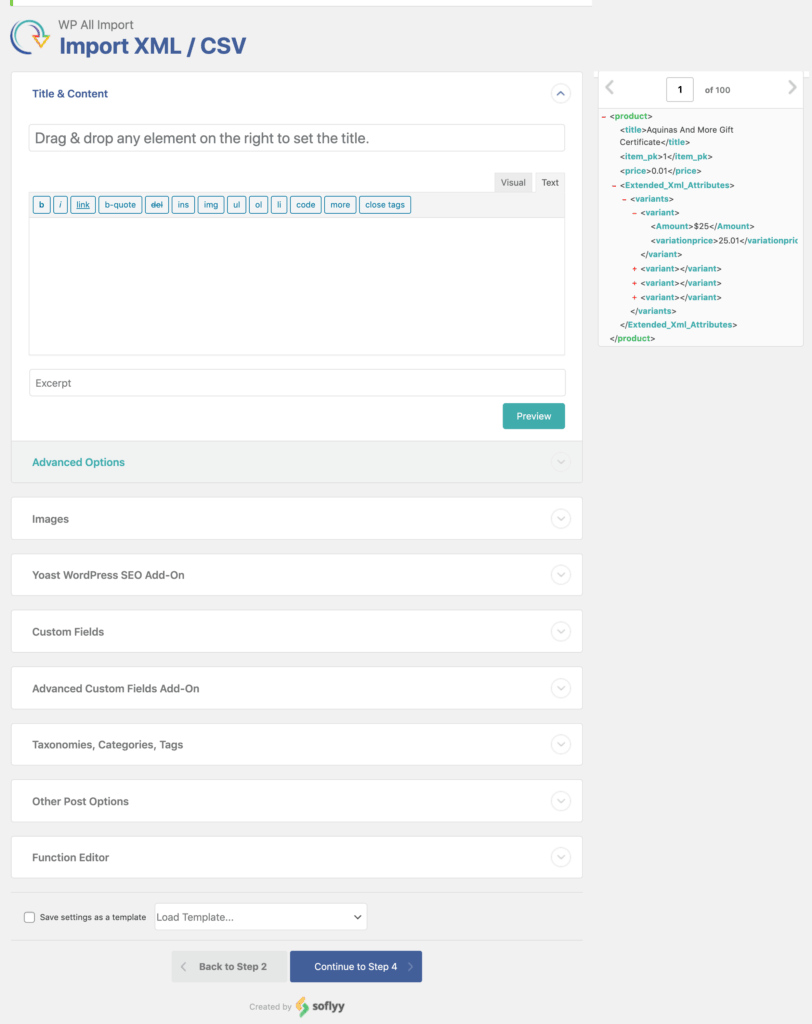
Every column or element from your import file will be displayed on the right. On the left you have your import. WP All Import will create posts using the import template you create here. Simply drag your import data from right to left. You can fill in as much or as little of the fields as you like depending on your needs.

Step 4: Choose Which Data to Update

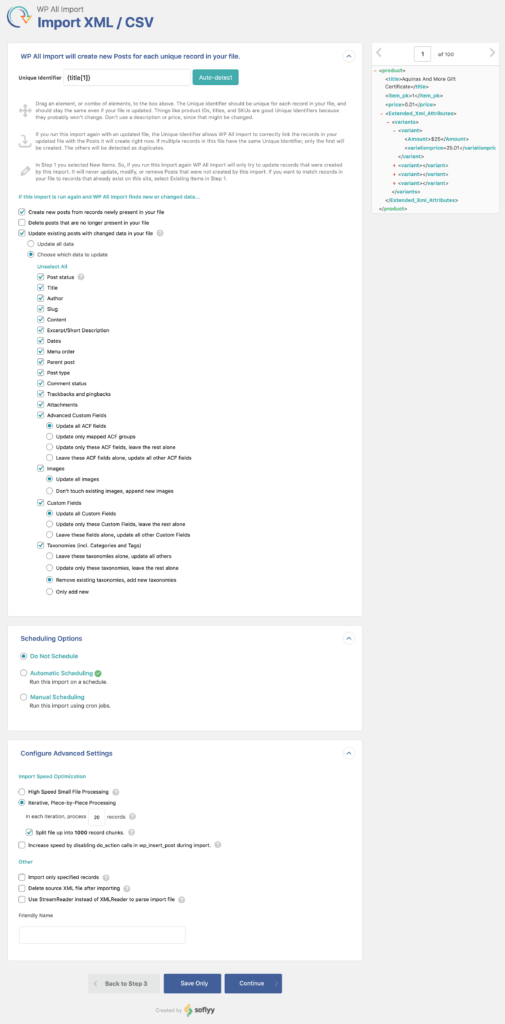
Here you can tell WP All Import how to handle each specific piece of data. For example you can have it only add new images to posts, or just update the stock and price for your products.

You can also configure this import to run on a schedule, and other advanced options.

Step 5: Confirm & Run Import

Now it's time to run your import.

Importing Images From Your Server

Importing Images From Your Server

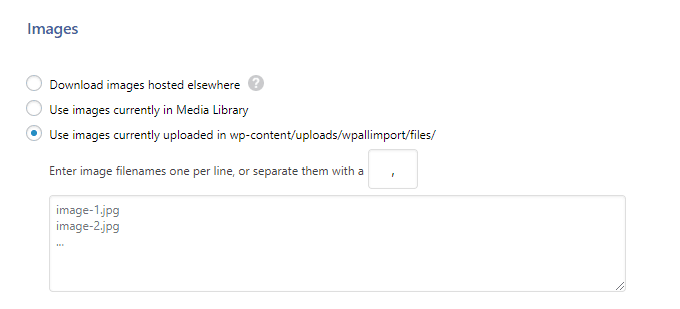
Importing images that already exist on your server is exactly the same as importing images from a URL, except you only need to specify the file name of the image.

The images you are importing must be uploaded to /wp-content/uploads/wpallimport/files/

The images in this folder will be copied to the paths used by your WordPress Media Library when the import is run – typically, /wp-content/uploads/YYYY/MM/.