How to Export WooCommerce Orders to CSV, Excel, or XML

How to Export WooCommerce Orders to CSV, Excel, or XML

If you would like to use our sample data for this tutorial, try our online sandbox and choose the WooCommerce Store option.

To export orders, go to WP All Export › New Export and select WooCommerce Orders. Next, use the drag and drop tool to build your order export file. Then simply run the export and download your file.

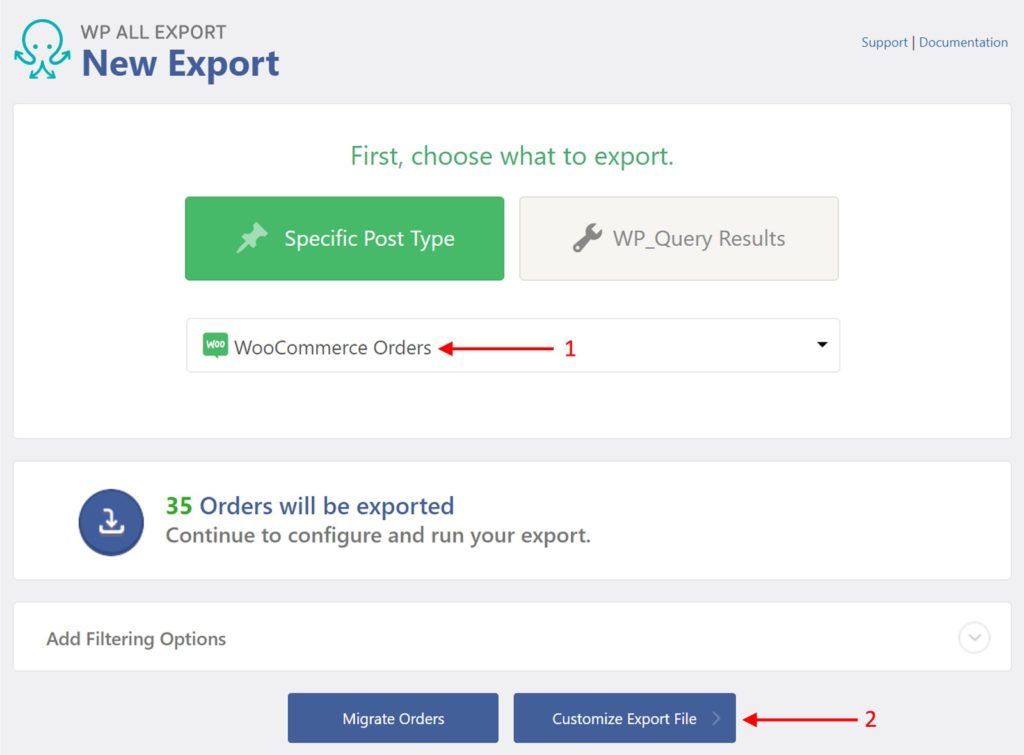
Step 1: Create a New Export for WooCommerce Orders

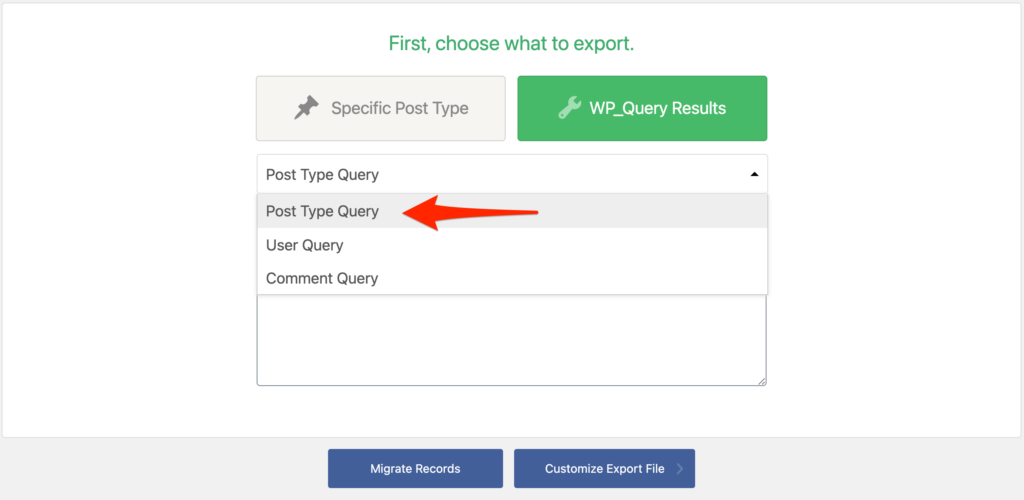
Go to All Export › New Export and choose to export WooCommerce Orders. Click Customize Export File to continue.

Select Export WooCommerce Orders

Step 2: Select Your WooCommerce Order Export Columns

Most WooCommerce order exports require only a subset of the order columns.

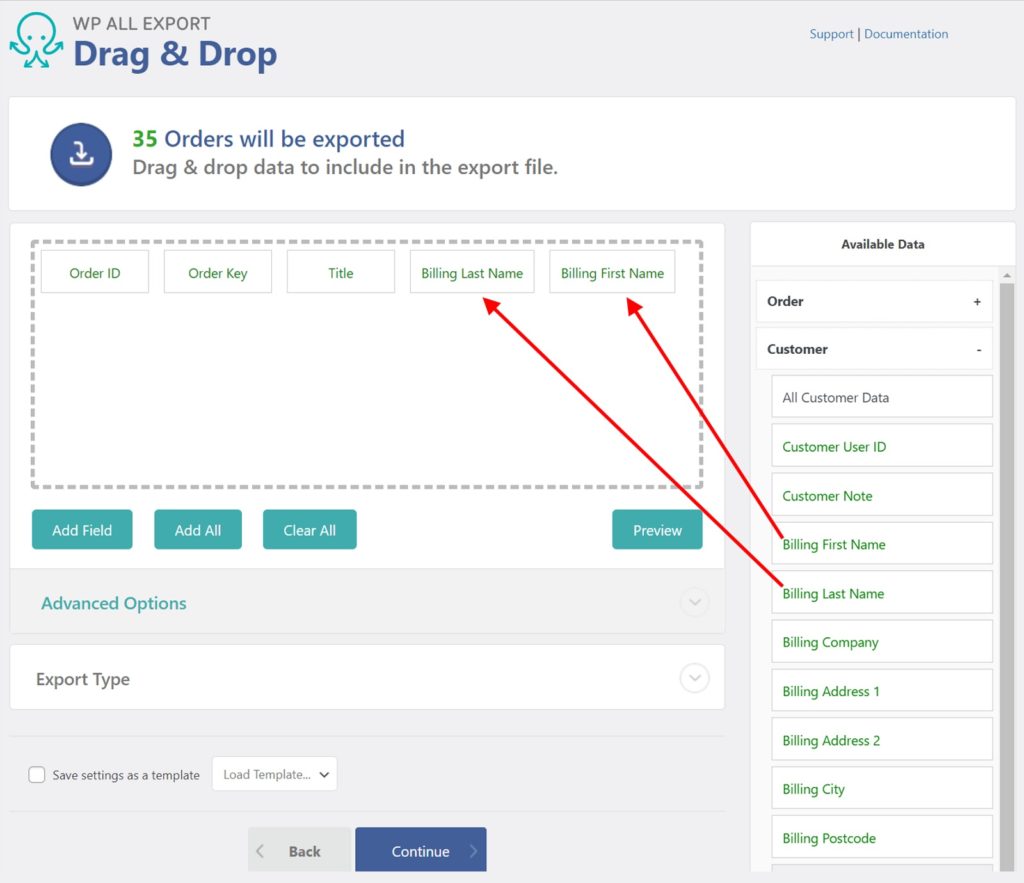
WP All Export lets you choose your order export columns using a simple Drag & Drop interface.

All of the relevant order tables and fields are listed in the Available Data section on the right. To include a field as a column in the order export file, simply drag the field into the column selection area:

Customize Columns

WooCommerce Order Export Fields

The available export fields are categorized into the following sections: Order, Customer, Items, Taxes & Shipping, Fees & Discounts, Notes, Refunds, Custom Fields, and Other.

WooCommerce Order Data

Basic WooCommerce order information is found under Available Data › Order.

Order ID: The Order ID as assigned by WordPress.Order Key: An order code used to differentiate orders within WooCommerce.Order Date: The date when the order was placed, in Y-m-d H:i:s format.Completed Date: The date when the order was completed, in Y-m-d H:i:s format.Title: The order’s title.Order Status: The order’s current status. The possible WooCommerce order statuses are wc-completed, wc-pending, wc-processing, wc-on-hold, and wc-cancelled.Order Currency: The currency in which the order was placed, for example, USD.Payment Method Title: The name of the payment method chosen by the client, for example, PayPal.Order Total: Total amount the client has to pay, for example, 105.15.

Export WooCommerce Orders Order Section

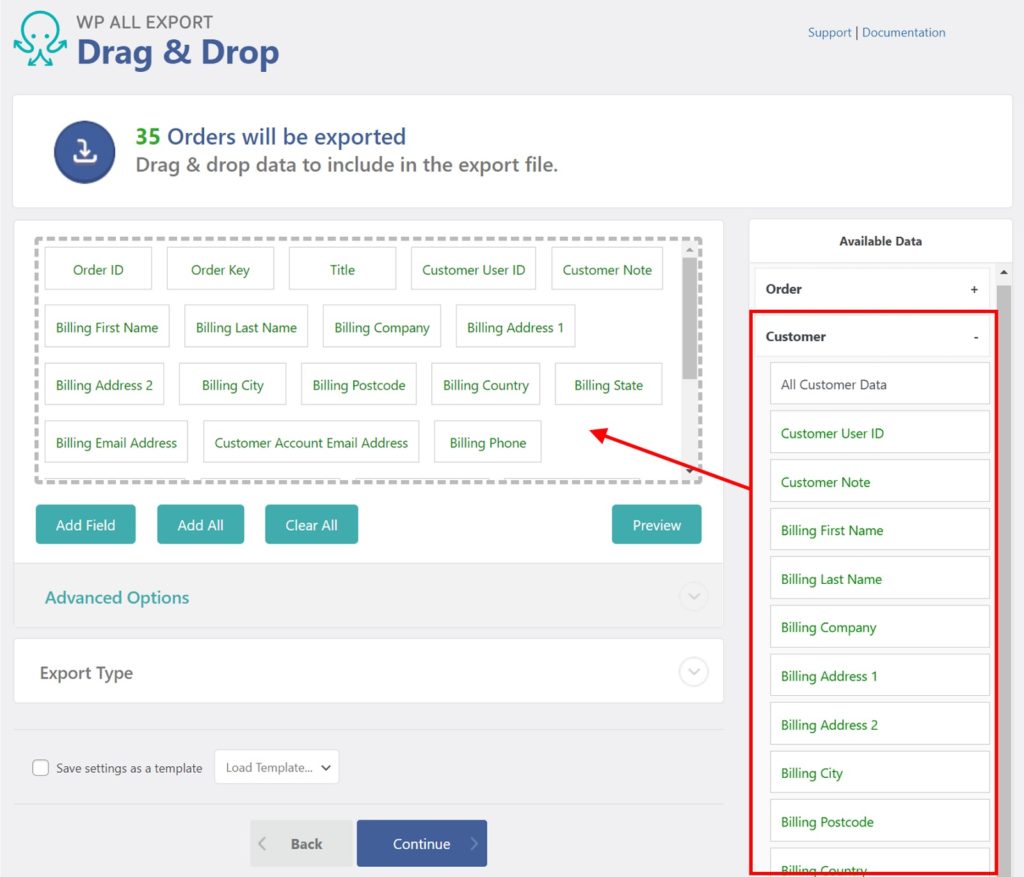
WooCommerce Customer Data

Customer information for WooCommerce orders is located in Available Data › Customer:

Customer User ID: If the customer is registered on the site, this exports their numerical WordPress user ID. If it’s a guest customer, exports 0.Customer Note: Notes left by site administrators about the customer.Customer Account Email Address

Every customer in WooCommerce has a billing address and a shipping address, added as custom user meta. Both sets of addresses are organized in the same way:

First NameLast NameCompanyAddress 1Address 2CityPostcodeCountryStateEmailPhone

Export WooCommerce Orders Customer Section

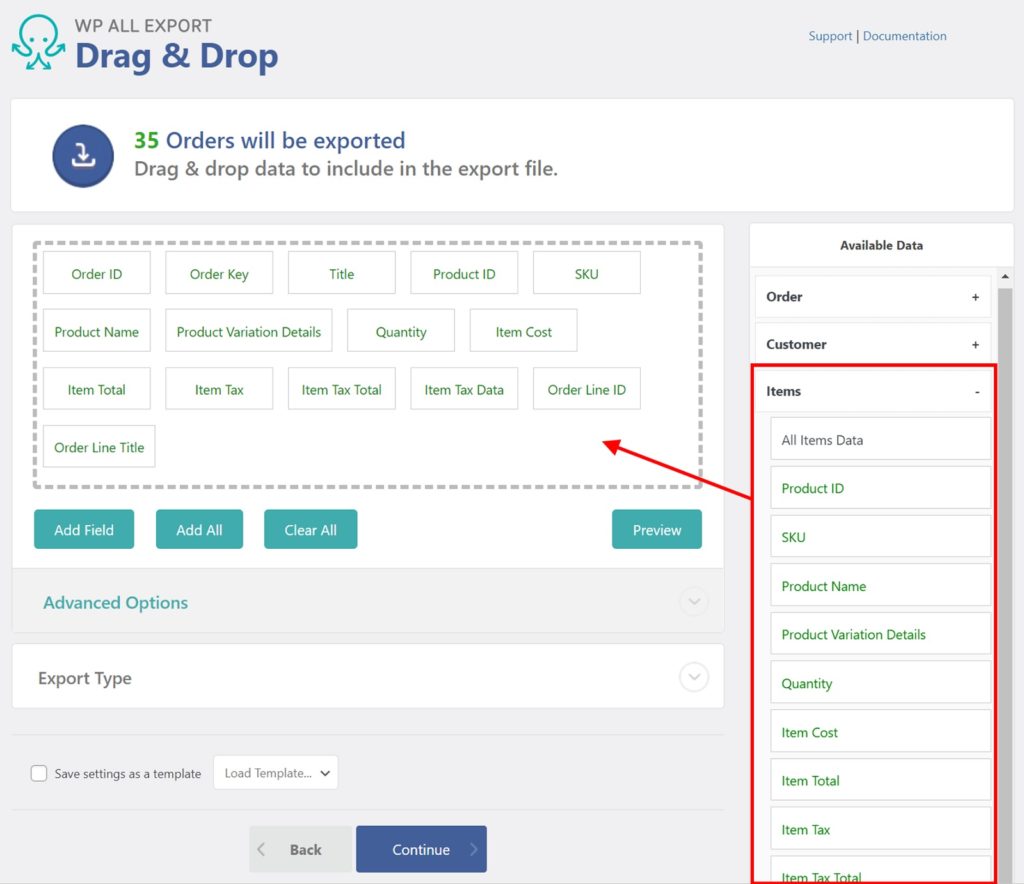
WooCommerce Order Items

The products purchased in WooCommerce orders are found in Available Data › Items.

Product ID: The post ID of the product, automatically assigned by WordPress. For variable products, this would be the post ID of the variation purchased, not the parent product.SKU: The product code used to reference and differentiate products.Product Name: The product’s name, or the parent product for variations.Product Variation Details: If the product has variations, this exports its attribute’s name (in the column header) and its attribute’s value; if there are multiple attributes on a single product, each attribute gets its own column.Quantity: Amount of items ordered.Item Cost: Cost per item.Item Total: Item cost multiplied by quantity, it’s the total amount for each purchased item(s) without taxes or shipping.Item Tax: Total tax for the item(s).Item Tax Total: Total tax for the item(s).Item Tax Data: Exports a serialized array that contains the subtotal and total tax. When empty, exports an empty serialized array such as a:2:{s:8:”subtotal”;a:0:{}s:5:”total”;a:0:{}}.Order Line ID: A numerical, incrementing ID assigned to all orders. Similar to post IDs.Order Line Title: Every product in an order is a line item. The Line Title is the product name.

Export WooCommerce Orders Items Section

The Items section has several subsections where you can find all information related to the products contained in WooCommerce orders: Product Data, Taxonomies, Custom Fields, Attributes, and Advanced.

The following is a list of the important, most commonly used fields. Read more about these fields and others in our walkthrough on how to export WooCommerce products.

Product DataContentExcerptDatePost TypePriceRegular PriceSale PriceStock StatusStockExternal Product URLTotal SalesTaxonomiesProduct TypeProduct VisibilityProduct categoriesProduct tagsCustom Fields_thumbnail_id__is_newly_created_productAttributesProduct ColorProduct SizeAdvancedDownloadableVirtualPurchase NoteFeaturedWeightLengthWidthHeightTax ClassTax Status

Export WooCommerce Orders Items Subsections

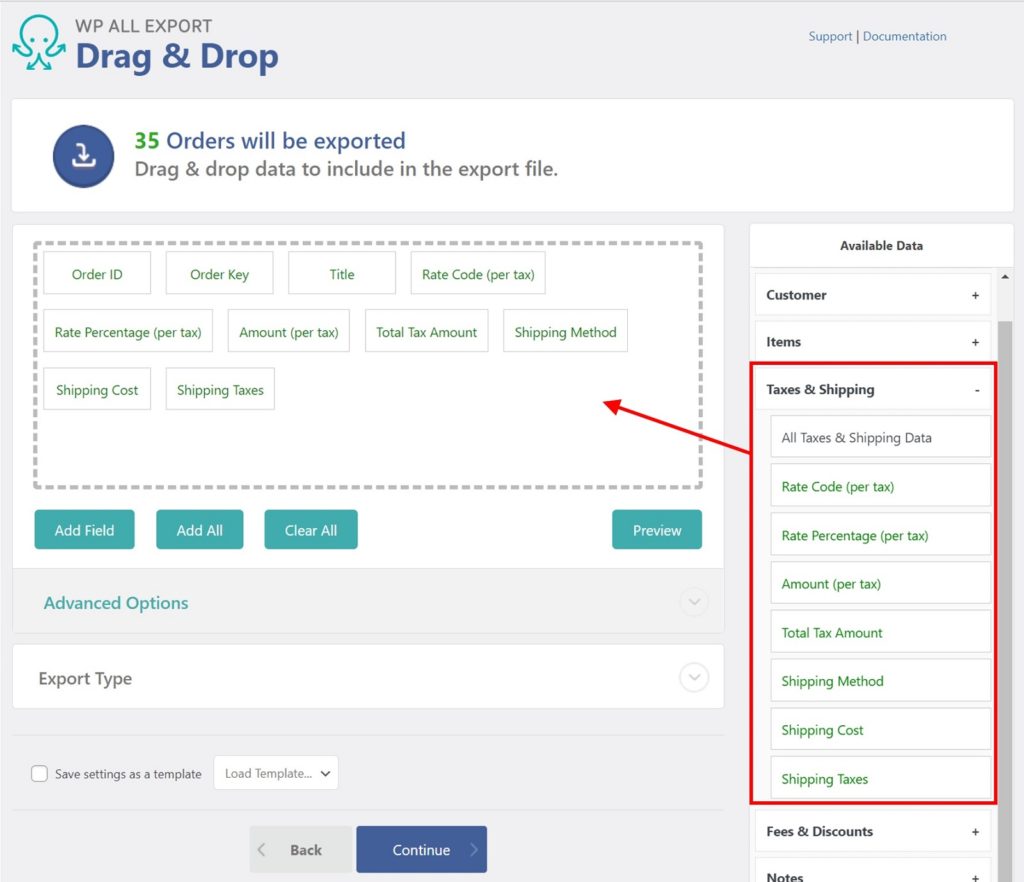
WooCommerce Order Taxes & Shipping

Tax and shipping information for WooCommerce orders is located in Available Data › Taxes & Shipping:

Rate Code (per tax): This is the slug of the tax rates assigned to the ordered product.Rate Percentage (per tax): Percentage amount to be taxed. Exports a numerical value such as 21.0000. Adding this export field also adds the Rate Name export field.Amount (per tax): Tax amount per tax applied. Multiple values are separated by a pipe character |.Total Tax Amount: Total tax amount to be charged. If there’s no tax, exports 0.Shipping Method: Shipping method selected by the customer.Shipping Cost: Total cost for the shipping.Shipping Taxes: Exports a serialized array with the total shipping taxes, for example, a:1:{s:5:”total”;a:1:{i:1;s:3:”2.1″;}}.

Export WooCommerce Orders Taxes and Shipping Section

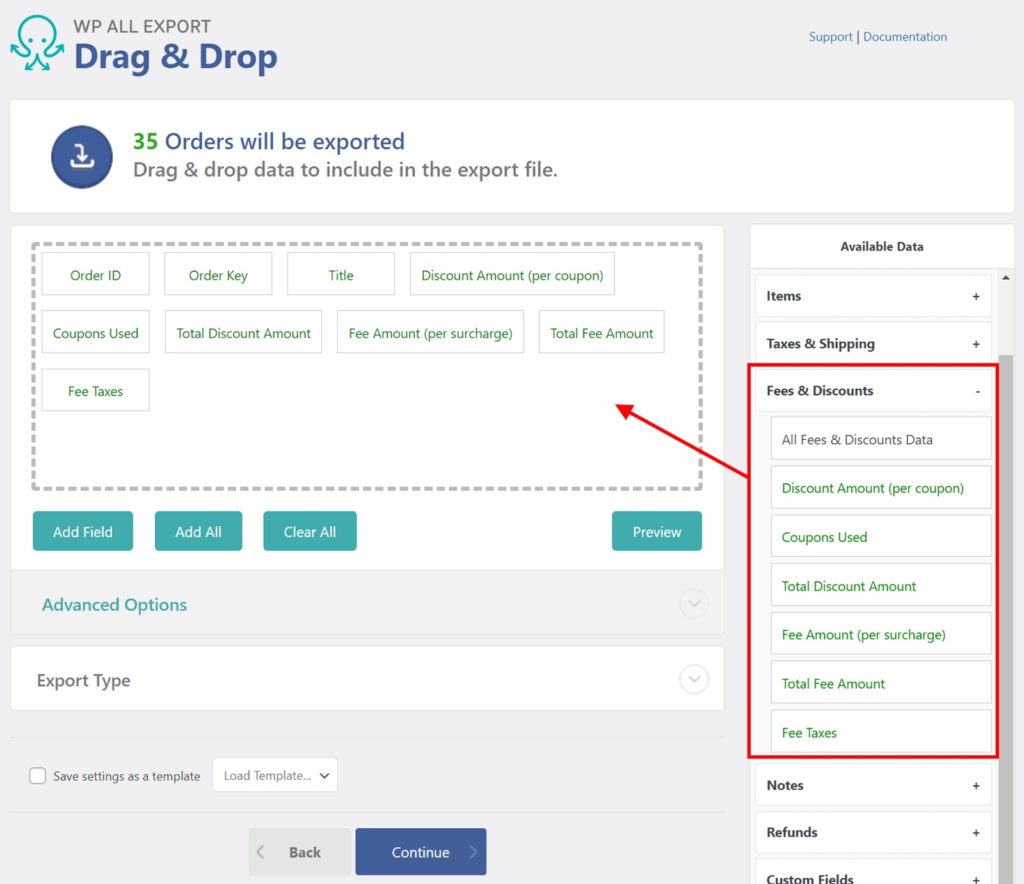
WooCommerce Order Fees & Discounts

Data related to fees and discounts are found in Available Data › Fees & Discounts:

Discount Amount (per coupon): Total amount discounted for each used coupon. A pipe character | is used to separate multiple values, e.g. -18.91|-3.78. Exporting this field also adds the Coupon Code export field.Coupons Used: Coupon codes used in this order. Multiple values are separated by a pipe character |, for example, discount8|NEWUSER2.Total Discount AmountFee Amount (per surcharge): Again, a pipe character is used to separate multiple values. This field also adds the Fee Name export field.Total Fee Amount: Total amount of fees being charged to the order.Fee Taxes: Exports a serialized array with the total fee taxes, for example, a:1:{s:5:”total”;a:1:{i:1;s:3:”2.1″;}}.

Export WooCommerce Orders Fees and Discounts

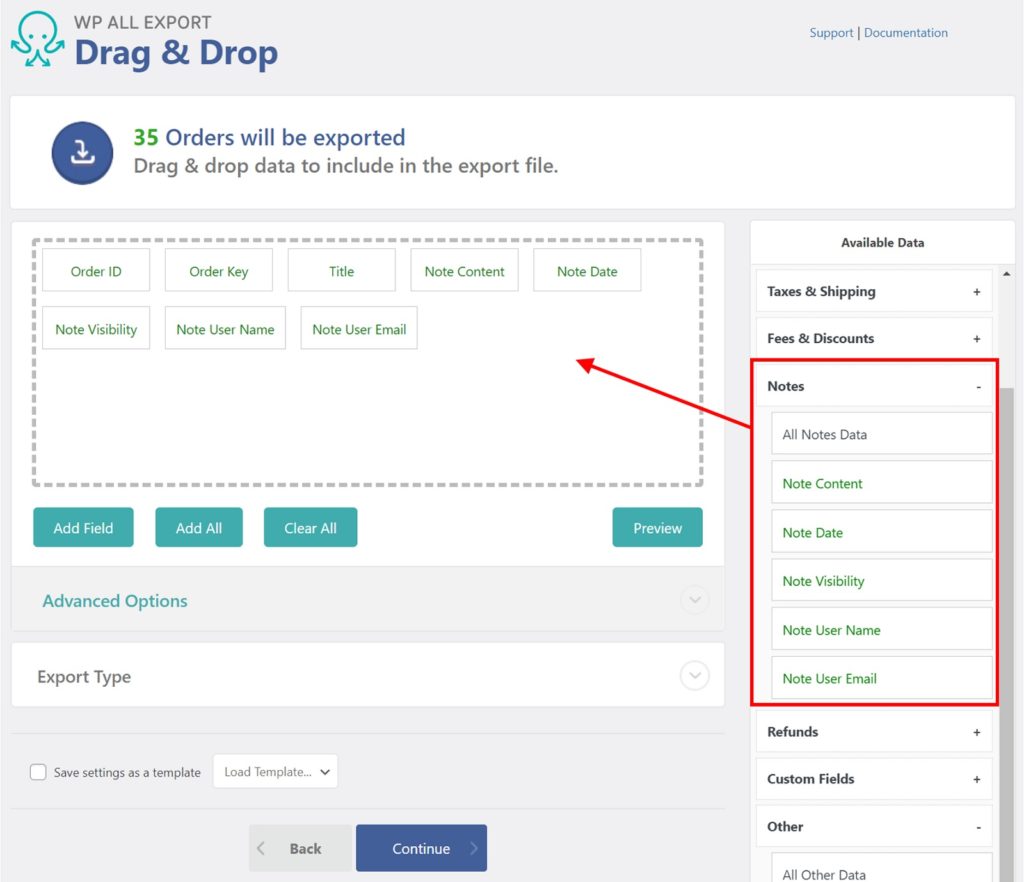
WooCommerce Order Notes

Notes attached to WooCommerce orders are found in Available Data › Notes. Multiple notes on the same order are separated by a pipe character:

Note Content: Exports the note’s content as a text string.Note Date: Exports the date when the note was made. Format Y-m-d H:i:s.Note Visibility: Exports the note’s visibility. Either customer or private.Note User Name: Exports the username of the note’s author.Note User Email: Exports the email address of the note’s author.

Export WooCommerce Orders Notes

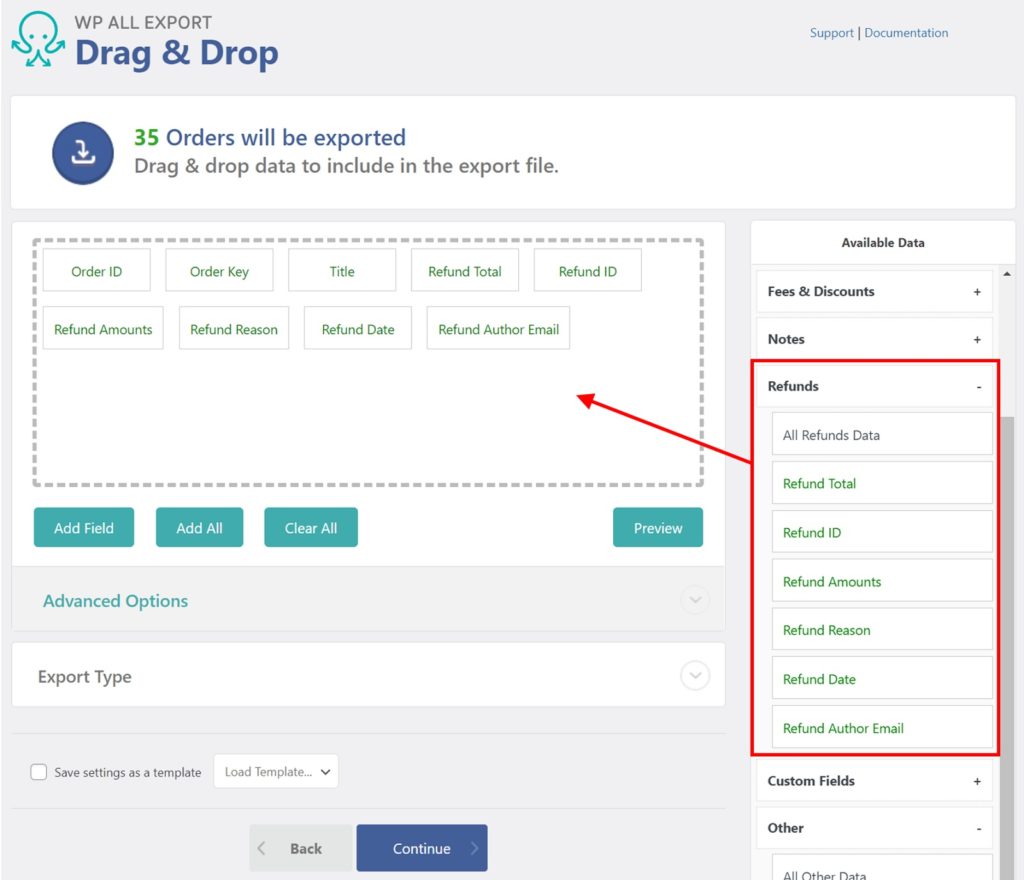
WooCommerce Order Refunds

Refunds applied to WooCommerce orders appear in the Available Data › Refunds. A pipe character is used to separate multiple refunds:

Refund Total: Exports a numerical value with the total amount being refunded, for example, 12.69. Exports 0 when there’s no refund.Refund ID: The post ID of the refund, automatically assigned by WooCommerce when the refund is processed.Refund Amounts: The value of each refund applied to the order.Refund Reason: The reason for the refund. Exports a text string.Refund Date: Exports the date when the refund was done. Formatted in Ymd, for example, 20210428.Refund Author Email: The email address of the user that made the refund.

Export WooCommerce Orders Refunds

WooCommerce Order Custom Fields

Any other information added as a custom field to WooCommerce orders appears in Available Data › Custom Fields:

_date_paid: Exports a Unix timestamp of when the order was paid, for example, 1619630726._date_completed: Exports a Unix timestamp of when the order was completed.

Other WooCommerce Order Fields

Other fields attached to WooCommerce orders appear under this section. This is an incomplete list with the most relevant export fields:

Tax Class: Exports the slug of the tax class associated with the ordered item, for example, reduced-rate.Prices Include Tax: Wether the prices include the tax or not. Exports yes or no.Created Via: The system that created the order. Exports admin or checkout.Payment Method: Exports the slug of the selected payment method, for example, paypal or stripe.

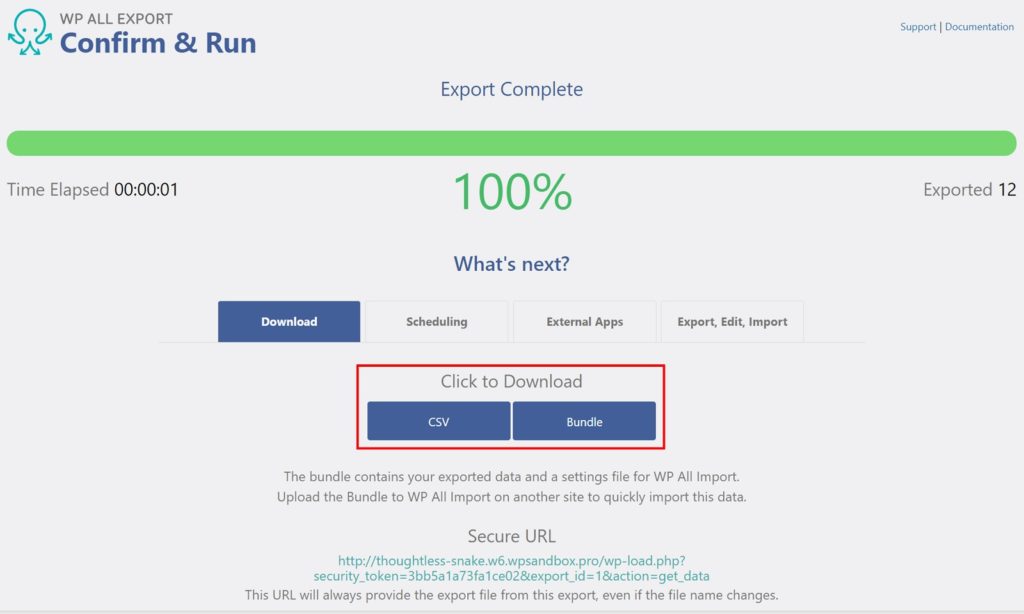
Step 3: Download Your WooCommerce Order Export

Once the WooCommerce order export is set up as needed, click Continue and verify the export settings. Click Confirm & Run Export to run the export.

After the export has been completed, click CSV or XML to download the exported orders. The Bundle is a zip file that contains the export file and an import template, which allows migrating WooCommerce orders into another site using WP All Import.
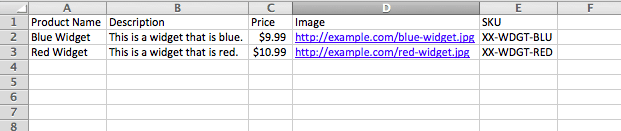
Export WooCommerce Orders Confirm and Run

Here’s an example file with a sample of exported WooCommerce orders:

Sample Data

Advanced Topics

Filtering WooCommerce Order Exports

Just as most WooCommerce order exports require only a subset of the order columns, they also require only a subset of the orders. This subset can be based on date ranges, geographic locations, or any other order-related fields.

To select your orders, first expand the Add Filtering Options panel near the bottom of the New Export screen. To set a filter, you must select an Element, a Rule, and a Value:

Single Filter

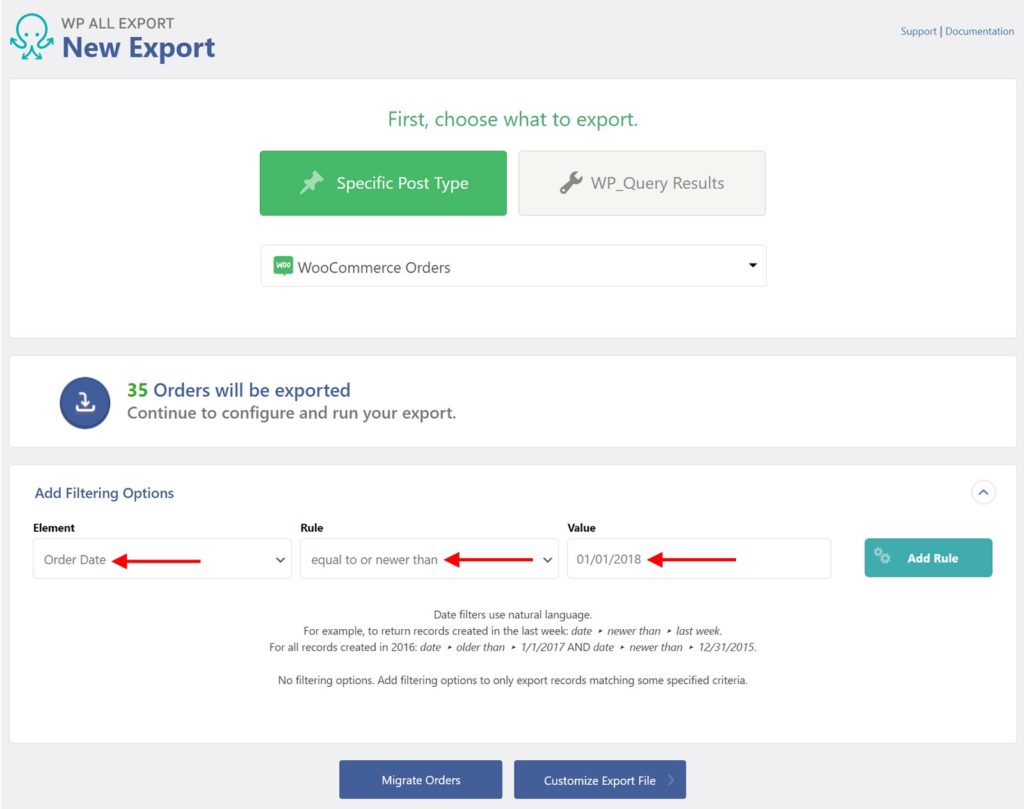
In this case, we are setting:

Element = Order Date

Rule = equal to or newer than

Value = 01/01/2018

This is equivalent to saying, “Export WooCommerce orders with an order date equal to or newer than January 01, 2018.”

You can also combine multiple filter rules. For example, if you want to only export orders from last month, you could use these rules:

Element ‘Order Date’ -> Rule ‘equal to or newer than’ -> Value ‘first day of last month 00:00:00’
AND
Element ‘Order Date’ -> Rule ‘equal to or older than’ -> Value ‘last day of last month 23:59:59’

Export only orders from last month

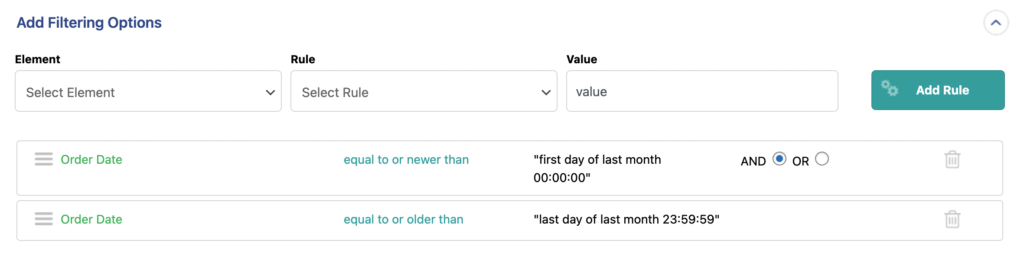
Since these are relative date rules, you won’t have to update them each month. Learn more about the syntax you can use in date filters here: https://www.php.net/manual/en/datetime.formats.relative.php.

Export WooCommerce Orders Advanced Options

The Advanced Options panel is found near the bottom of the Drag & Drop screen:

Export WooCommerce Orders Advance Options

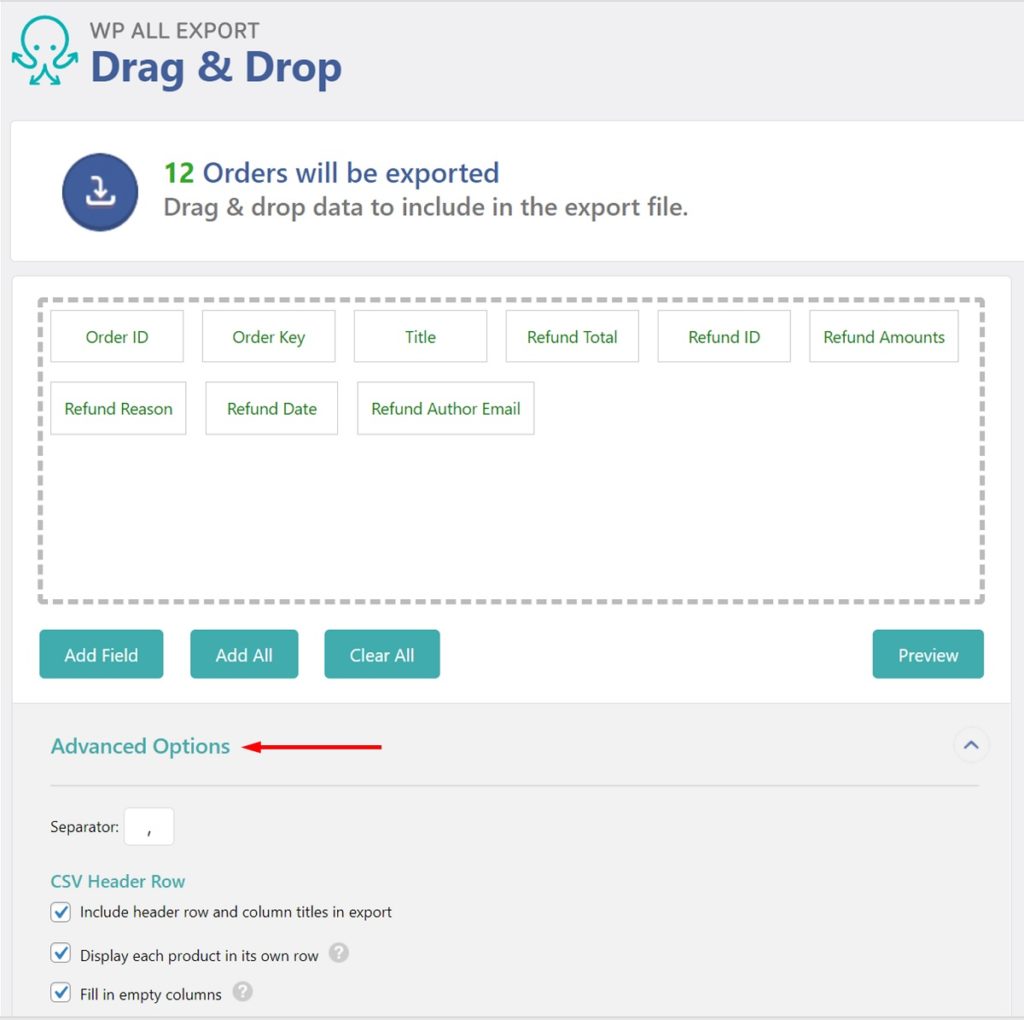
This panel allows you to control various settings related to the export file. The options vary depending on the export file type, such as CSV, Excel, XML, etc. They include

Include header row and column titles in export: When enabled, the first row is the header with column titles. When disabled, the first row is the first order with no header or column titles.Display each product in its own row: When enabled, orders with multiple products will export each product in its own row, with each order spanning multiple rows. When disabled, each exported row will contain an order with all of the product data separated by pipe characters.Fill in empty columns: When enabled, orders that span multiple rows will have all order data duplicated for each row. When disabled, orders that span multiple rows will only have data listed once. Subsequent rows will only contain data related to the product exported in that row.

Read our guide on exporting WordPress data to XML for info on advanced XML export options.

How to Customize Your WordPress Export with WP_Query

How to Customize Your WordPress Export with WP_Query

WP_Query is a WordPress class that allows you to fetch posts directly from the database. It’s powerful enough for developers to perform extremely complex queries, but simple enough for a regular WordPress user to learn.

You can learn more about WP_Query and all of its parameters here: https://developer.wordpress.org/reference/classes/wp_query/

Rather than writing these WP_Query expressions by hand, you can use https://generatewp.com/wp_query/ to create them for.

Using WP_Query in WP All Export

Go to All Export › New Export and select the WP_Query Results option. Then select the query type from the drop-down. All of the custom post types available for export are added here automatically. In our default install, there are three options:

Post Type QueryUser QueryComment Query

These options use WP_Query, WP_User_Query and WP_Comment_Query.

In this example we’re going to choose Post Type Query.

Post Type Query

Building the Query

The most basic query would include a post type and a post status. For example, to get all published posts in the default WordPress “Posts” post type, the query would be:

“post_type” => “post”,
“post_status” => “publish”

Simple Posts Query

Alternatively you could export all Media Library items like images and attachments with this query:

“post_type” => “attachment”, “post_status” => “inherit”

If you need to define multiple post types and multiple post statuses, you can use arrays. For example, you can get all pages and posts that are either pending, published, or drafts with the following query:

“post_type” => array( “post”, “page” ),
“post_status” => array( “publish”, “draft”, “pending” )

Query multiple post types and statuses

Advanced WP_Query Example

The WP_Query class has the ability to do custom field queries, taxonomy queries, author checks, and much more. There’s no way that we can cover all of the possibilities in this article, but here we’ll cover some more advanced queries just to showcase the power of this feature.

Specific criteria for WooCommerce ProductsFor this example, we’ll export a set of variable WooCommerce products with the following rules:

Product must be published.Stock value is higher than 0.Products are sorted by title in ascending order.

The query:

“post_type” => array( “product”, “product_variation” ),
“post_status” => “publish”,
“orderby” => “post_title”,
“order” => “ASC”,
“meta_query” => array( array(
     “key” => “_stock”,
     “value” => 0,
     “compare” => “>”
) )

Custom Post Type SearchFor this example, we’ll search all posts in the post type properties added by a real estate theme. The criteria:

Post type is propertiesStatus is publishAuthor ID is 3, which is a real estate agentThe property has the For Sale category assigned to itCustom field _featured is set to 1, making it a featured property in the theme

The query:

“post_type” => “properties”,
“post_status” => “publish”,
“author” => 3,
“tax_query” => array( array(
     “taxonomy” =>      “property_category”,
     “field” => “slug”,
     “terms” => “for-sale”,
) ),
“meta_query” => array( array(
     “key” => “featured”,
     “value” => “1”,
     “compare” => “=”,
) )

How To Import Variable WooCommerce Products

How To Import Variable WooCommerce Products

In-Depth Tutorial

About these docs: We have a few video tutorials covering different use-cases below. To learn more about the other features of the WooCommerce add-on such as syncing stock levels, use the documentation menu to the right. Below the videos is also text documentation explaining the same things as the videos – so watch if you prefer videos, or read if you prefer text. We recommend the videos!

Part 1: Importing Variations From CSV or XML

Part 2: Importing Variations Stored As Child Elements from XML

You’ll notice that in the above tutorial, I only import from CSV files. However, importing from an XML file that is structured in a similar way to a CSV file is exactly the same. For example, if your XML file contains many elements, and each element contains either a different product or variation, then the process is exactly the same.

However, some XML feeds store their variations as children of the main product element, for example:

10027105
Adidas
Adidas Mens Climacool Boat Lace Shoes – Sale


Footwear
Casual
Men’s


74.99
59.99

19301
0886833708180
8
Dark Indigo
74.99
59.99

In this case, the next video tutorial explains what to do.

Part 3: Setting Up An Excel File To Import Product Variations

Maybe you want to manually create a file containing your variations, because you don’t already have a point of sale or inventory management system that does it for you, or don’t have a product feed from a dropshipper or affiliate network. Sad days… but here’s how to do it, using Excel:

Now for the text documentation…

When importing variations with WP All Import, choose “Variable Product” in the WooCommerce add-on in Step 3 of WP All Import.

Then, you must configure three things:

General tab: you must specify the price. WooCommerce won’t show variations on the frontend of your site unless the price is present.Attributes tab: here you specify the variation attributes – for example Size or Color.Variations tab: here you specify how WP All Import links multiple variations from your XML or CSV file together to form a single variable product.

It is highly recommended that you watch the video above before reading onward, as the video will give you a big picture overview of how to import variations, while you can learn the specific details below.

Linking Multiple Variations Together To Form A Variable Product

WooCommerce stores a variable product as a single “parent” product, with multiple “child” variations.

For example, a T-Shirt might have three “child” variations – Small, Medium, and Large.

WP All Import can import XML and CSV files that contain parent products with child variations, and it can also import files that only contain product variations, with no parent products.

On the Variations tab of the WooCommerce Add-On, you specify how WP All Import groups multiple product variations into a single variable product. Typically, for CSV files, you’ll have one product variation per row, and for XML files, one product variation per record.

Example A – Linking Variations To Parent Based On Parent SKU

Link to parent based on SKU

In this example, you’ll notice there are two products (a mug and a t-shirt), with two variations each (based on Color).

In this example our file contains both the parent products and the variations.

The variations are grouped to their parent products using the SKU and Parent SKU columns. We can use the Parent SKU column to tell WP All Import to assign the variations to the parent product that has an SKU that is the same as the variation’s Parent SKU.

Download: CSV · XML

Example B – Product Variations Grouped By A Unique Identifier

Variations by Group ID

In this example, you’ll notice there are two products (Coca Cola and Sprite), with four variations each (based on Size).

The variations are grouped together with the Group ID column.

We can use the Group ID column to tell WP All Import to group all the variations with the same group ID into a single variable product.

In this example our CSV file contains only variations. There are no parent products, but since WooCommerce requires parent products, WP All Import will automatically create the parent products for us.

Download: CSV · XML

Example C – Variations Grouped By Title

Matched by Title

In this example, you’ll notice there are two products (Steak and Lamb), with three variations each, based on Weight for the Steak, and Quantity for the Lamb.

The Quantity attribute will be ignored for the Steak, and the the Weight attribute will be ignored for the Lamb.

In this example our file contains both the parent products and the variations.

The variations are grouped together by title. We can use the Product Title column to tell WP All Import to assign the variations to the parent product that has the same title.

Download: CSV · XML

Example D – Variations Grouped By Title, No Parent Products

Match by title, no parents.

In this example, you’ll notice there are two products (Apple tree and Orange tree), with four variations each, based on the tree height and type of rootstock.

In this example our file contains only variations, without parent products. WP All Import will automatically create the parent products.

The variations are grouped together by title. We can use the Product Title column to tell WP All Import to create multiple variable products, with each one containing all the variations with the same title.

Download: CSV · XML

Example E – Variations As Child XML Elements

If you are importing an XML file and the variations are child elements of your product elements, instead of separate product elements, use this option.

In the example XML below, you can see all variations of a product are enclosed in a element, where one product can have any number number of variants.

10027105
Adidas
Adidas Mens Climacool Boat Lace Shoes – Sale


Footwear
Casual
Men’s


74.99
59.99

19301
0886833708180
8
Dark Indigo
74.99
59.99

When importing variations in this format, you don’t need to set anything in the General tab or the Attributes tab. You set the price and the attributes in the Variations tab.

For WP All Import to detect the variations, you must define the XML elements that contain them. You can do this by dragging & dropping one of the elements to the Variations XPath box.

Variations by XPath

You then set your attributes by dragging & dropping attributes from the popup XML tree containing the XML for the variation, instead of using the main XML tree.

You can set your price using the price in the popup XML tree if available, or if you want to set all the variation prices to the price of the parent product, you can drag the price from main XML tree. When dragging XPath from the main XML tree to any of the boxes below Variations XPath, you must check the XPath from Parent option.

Mapping XML child variations

In the screenshot above, you can see there are 10 total variants of the current product. Configure the options for just one, and WP All Import will automatically loop through the other 9 variations and create variations for all of them.

Configuring Variation Attributes

Attributes are those things that users can change to choose the variation they want. Each attribute can have multiple possible values – users select these values to choose the particular variation they want to purchase. For example, a T-Shirt could have Color and Size attributes.

Variation selections

In the example above, the two Attributes are Size and Depth. Attributes can be configured on the Attributes tab of the WooCommerce add-on.

Importing Attributes

Additional Information On Attributes

If your file has many types of variable products with different attributes – for example, t-shirts in your file have Size and Color attributes, and paintings and posters have Canvas Size and Depth attributes,  in the same file, just configure all the attributes in WP All Import. WP All Import will ignore the attributes when they don’t exist for a particular product in your file. So you won’t end up with t-shirts with Canvas Size and Depth attributes, or posters with Size and Color attributes.

Some attribute names are reserved. For example, you can’t use “Type”. If you can’t use a certain attribute name inside of WooCommerce, you can’t use it inside WP All Import either.

Additional Information

Importing Simple And Variable Products At The Same Time

Configure your import as if you were only importing variable products.

WP All Import will automatically create simple products for products that have no variations or only a single variation.

Using Link All Variations

On the Attributes tab, you’ll notice a Link All Variations option. Use this option if the data for your variations is stored all in a single row. It works just like the Link All Variations option inside WooCommerce.

Link all variations

In above example, ‘Baseball Cap’ is a product with 3 color variations and ‘Mug’ is one with 2 color variations.

Each color is separated by a pipe symbol – “|”.

Using the settings below, the WooCommerce add-on for WP All Import will automatically generate variations for each color.

If your file is using something other than a | as a separator, you can use a PHP function to replace the it with a |.

For example, if you had a Color column containing “Red,Blue,Green”, you’d replace the commas with pipes like this:

[str_replace(“,”, “|”, {Color[1]})]

Link all variations settings

Updating Prices

Updating Prices

Updating prices is done basically the same way as updating stock levels. There are only two differences.

1. Instead of specifying the stock levels, specify the prices in the WooCommerce add-on.

2. Instead of entering in the field names for stock levels, specify the correct Custom Field names for prices in Choose which data to update in Step 4.

Syncing Stock Levels

Syncing Stock Levels

You’ve imported all of your products into WooCommerce. You have a separate XML or CSV file containing your stock levels, and you want to synchronize the stock levels on your site with the stock levels in your XML or CSV file.

You only need these instructions if you have a separate file with stock levels. If the same file you used to import your products also contains your stock levels, just use the Re-Run Import option. 

Each record in your stock level feed must contain the stock quantity or status, and an identifier that will allow WP All Import to assign the correct stock level to the correct product. Usually, this will be the product’s SKU.

Stock Record

Use the following settings in Step 1 of WP All Import.

Import Stock Levels

Note that we’ve specified the URL to our stock levels file. Later, this will allow us to set up a cron job to automatically download and import the stock levels from this URL, every day.

Continue to Step 3, and set your Stock Qty in the Inventory tab of the WooCommerce add-on. You can leave all other settings and sections of Step 3 blank, or at the default values. The Product Type, for example, can be left at Simple product, even if you are updating stock for other types like Variable products. The only settings that WP All Import will pay attention to are those related to product stock.

Step 3 Stock Settings

Now continue to Step 4. WP All Import may warn you that your post title and content are blank, but you can ignore this. We don’t need to import post titles and content, only stock levels.

In Step 4, it’s time to specify how WP All Import knows which product a stock level in a particular row or record in your XML or CSV file should be assigned to.

We do this using the SKU. Our file contains the SKU that each stock level is associated with. Using the following settings, we tell WP All Import that for each record or row in our file, it should search for a Product containing an _sku Custom Field with the value in our file’s SKU column, and then import data into that Product based on the options we specified in Step 3.

Record Matching

Now we need to tell WP All Import to only update our product stock levels. WooCommerce stores these stock levels in Custom Fields called _stock and _manage_stock.

When the import is run, WP All Import needs to leave everything else alone. To do that, we use the Choose which data to update option.

You’ll also notice I’ve unchecked the Create new and Delete options, since we only want to import into existing Products.

Only update stock

I’ve chosen to only update the _stock and _manage_stock Custom Fields.

Run the import, and your Products will now show the updated stock statuses and quantities.

You can easily configure WP All Import to automatically re-check the stock XML or CSV file at a specific interval to keep your product stock levels always up to date, using cron jobs.

Note: If you remember, in Step 3 in the WooCommerce add-on, we left “Simple Product” as the Product Type. Notice that the Product Type box is left unchecked. This allows WP All Import to import stock levels to both simple and variable products at the same time, or just variable products, without updating their Product Type based on our selection in Step 3.

Example XML & CSV Files

Example XML & CSV Files

When importing Simple or External/Affiliate Products, WP All Import can import any XML or CSV file to WooCommerce. You don’t need to structure your file in a certain way or have specific column or element names for the import to work properly.

Special requirements only exist when importing variable products.

Download Example Files

File Structure

If you’re manually creating a file, we recommend using Excel to create a CSV. Put one product per row.

Example File

Terminated Imports & Server Errors

Terminated Imports & Server Errors

This means that your server is stopping the import process before it can complete. WP All Import processes records piece by piece to help prevent this from happening.

Sometimes you can prevent your server from terminating the import simply by lowering the records per iteration. Other times the reason for the termination has nothing to do with the records per iteration.

No matter the cause, the troubleshooting process always starts the same:

Lower the records per iteration. You can control how many records are processed in each iteration in Import Settings ▸ Advanced Options ▸ Iterative, Piece-by-Piece Processing. If your import is still being terminated with 1 record per iteration, then you’ll need to modify your server settings so it will allow WP All Import to run.

Contact your host and have them check your server’s error log. They will be able to see exactly why your server is terminating the import and they will know exactly how to fix it. There isn’t anything we can do to help until your host has checked the error log and we know exactly what the issue is.

Server Timeouts

Servers have a number of settings that place hard limits on how long processes are allowed to run before they are terminated.

There are the two very common hard limits that our users run in to:

Maximum Execution Time (PHP): This is set in php.ini with max_execution_time. It determines how long a process is allowed to run before it’s terminated. You can ask your host to increase the limit, but this should be considered a last resort.

FCGID Timeouts (Apache): This is set in httpd.conf with FcgidIOTimeout.It determines how long mod_fcgid will wait while trying to perform a read or write. It should be set as high as your host will allow. In our experience 90 seconds is sufficient.

Server Errors

When servers are misconfigured or trying to do things that require more resources than are available, they will throw an error. The error message is usually just a 3-digit number. The number can give you some information about what the nature of the error. For example:

500 Internal Server Error: This often occurs when something in your WordPress theme or one of the plugins has some sort of issue.

503 Service Unavailable: This often occurs when the server is overloaded. It can also indicate that the security system on your server is blocking WP All Import.

504 Gateway Timeout: This is often related to the server being overloaded.

Our support team will not be able to help you troubleshoot these errors. You will need to contact your host to check your server’s error log.

Check Your Server’s Error Log

You’ll need to contact your host’s support team and ask them to look for error log entries around the time the error occurred. To help your host’s support team be sure to include the following information in your support request:

The exact time the error occurred, including the timezone. If you’re not sure when it occurred, please take the steps necessary to reproduce the error.Your IP address. Visit http://www.whatismyip.com/ for help.A screenshot of the error, including the URL in your browser.

If your server is throwing errors it is your host’s responsibility to make sure it is logged. If your host is unable to find any relevant entries in the error, have them make sure that error logging is enabled and that they are checking the relevant error log. There are usually at least three places errors are logged on your server:

PHPWeb Server (Apache or NGINX)Database (MySQL or MariaDB)

We will not be able to help you find, read, or interpret your server’s error log. Even if we were able to do so, you’d still need to contact your host to make the necessary changes to resolve the error. This is why you pay for hosting, and problems like these are where good hosts stand out from bad ones.

For a list of hosts that work great with WP All Import, see our recommended hosts page.

Import Speed

Import Speed

There are three main issues that will affect import speed:

Server Resources: If your server doesn’t have enough available resources this will slow down your import. So if you see that your server is maxing out its CPU or memory usage during an import, upgrading to a more powerful server will help.

Database Size: WordPress stores data in a SQL database. When WP All Import is importing data, it does the actual importing by interacting with your database. The larger your database, the longer each interaction will take.

External Images: Downloading images from somewhere else during your import will always make your import take longer. If the images are large, or the server providing the images is slow, the impact will be even greater.

Specific Problems & Solutions

Large Databases, Bloated Tables, and Big Import Files

As your database grows in size your imports will take longer. It is not possible to avoid this slowdown because as your database grows larger your server and WP All Import must do more work.

For example, when checking for duplicates, WP All Import must search through more records. When updating existing posts with new data, the more posts on the site, the longer it takes MySQL to find the correct post to update.

As your database grows in size you will eventually run up against the limits of WordPress’ database schema. We have seen some users successfully import over 500,000 records into WordPress with WP All Import. And the sites they have created are indeed performant and stable. This, however, is the exception, not the norm. Those users spent weeks on their imports and deployed professional grade server optimization and caching to get that kind of performance out of WordPress and WP All Import.

▸ Solution

Sometimes your database is bigger than it should be. We’ve seen some users suffering from slow imports, and when we look inside their database we find that the wp_options table has over a million entries. The most common reason for wp_options bloat is the transients cache, which you can manage with a plugin like Transients Manager. Check with your host or a database professional to see if your database is similarly bloated.

If you’re trying to build a site with 500,000 products, you’ll need a very powerful and professionally optimized server. This isn’t to accommodate WP All Import so much as it is to accommodate WordPress and WooCommerce.

Typically on a shared host, somewhere between 50,000 to 100,000 records seems to be the upper limit. Anything beyond that often results in server timeouts, slow imports, and long load times.

Slow External Image Hosts

Many users choose to import images from external hosts. In some cases the images are quite large and/or the external host is slow to serve them.

▸ Solution

Run some tests with images disabled. If your import speed improves, try your import using the Importing Images From Your Server method so you don’t have to download the images to your server during the import.

Disable the do_action to Speed Up Imports

Every time WP All Import creates a new post it uses wp_insert_post. The problem with this function is that it wasn’t designed for creating a lot of posts at once – it was designed for creating one post at a time. It can be slow, and part of the reason for the slowness is the do_action calls.

▸ Solution

In Manage Imports ▸ Import Settings ▸ Advanced Options you can enable the Increase speed by disabling do_action calls in wp_insert_post during import feature.

This will prevent other software in your WordPress site from interacting with posts as they are imported, so other plugins that are supposed to automatically do things to new posts may not work for imported posts.

See http://codex.wordpress.org/Plugin_API/Action_Reference and http://codex.wordpress.org/Function_Reference/wp_insert_post for details.

Shared Hosts and Low Server Resources

All servers were not created equally. Many times hosting companies will cram as many sites as possible into their hardware to keep costs down. Sometimes they will limit the amount of PHP processing time you are allowed or the number of SQL queries you’re able to make. Or maybe they’ll throttle your processing power. Or maybe they don’t do anything, but the 1,000 other websites running on the same piece of hardware are consuming so many resources that your import has to fight for CPU time to finish processing.

▸ Solution

If you’re running low on available resources, upgrading to a server with more available resources (amount of RAM, number of CPUs, etc) will help. But it will usually only help if you’re running low on available resources. While the actual clock speed of your server’s CPU, RAM, and disk do play a role in how long your import takes, it’s not a very big one.

Think of it like a moving truck.

If you’re moving and your truck is too small you’ll have to make more trips and this will slow you down. Buying a bigger truck will help. But if your truck is already big enough to fit all of your stuff, buying a bigger truck (more CPUs, RAM, etc) isn’t going to help you move any faster. Upgrading to a server with a faster CPU and disk would be like putting a new engine in your truck. Sure, your move might go a little faster, but it should not be the focus of your efforts.

See our recommended hosts page for a list of web hosts that work great with WP All Import.

My Import Runs Faster On Your Server

Our server hosts hundreds and hundreds of WordPress sites and is running multiple imports from different users at the same time. The hardware we use is quite powerful. But, it’s likely that the testing installation is able to run WP All Import faster only because it has an empty database with very few plugins installed.

We optimized our server to make sure multiple imports could be run at the same time and to scale up server resources as needed. We also spent some time making sure people wouldn’t run in to any server errors during their imports.

We didn’t make any effort to optimize the server so it would run imports any faster. In terms of server optimization, all that you can really do is make sure you’re running the latest version of PHP and that you aren’t maxing out your server’s available resources.

Dealing With Long Import Times

Sometimes there’s nothing you can do to speed up your imports. In these cases you can structure your imports so that it doesn’t matter how long they take. If you set your imports to run automatically with a cron job then you won’t have to keep your browser open while they process – they will just run in the background.

If your site is suffering from performance issues while your imports are running, you can enable the Cron Sleep option in All Import ▸ Settings. This will slow down your import so that it won’t slow your site down for visitors.

Recommended Hosts

Recommended Hosts

While many hosts work well with WP All Import, if you are looking for a specific recommendation Liquid Web and Nexcess work exceptionally well with WP All Import and we’ve partnered with them to offer a discount for new users. To take advantage of this discount, use the coupon code WPALLIMPORT35 for 35% off your first 3mo when signing up.

Managed Hosting Plans

Nexcess offers two products that we recommend, one tuned for general purpose WordPress sites, and another specifically tuned for WooCommerce sites. Both plans start at $19/mo and work great with WP All Import.

Nexcess Managed WordPress Hosting

Nexcess Managed WooCommerce Hosting

VPS, Cloud, and Dedicated Servers

If you need more horsepower, flexibility, or control over your hosting environment, then you probably want to go with one of Liquid Web’s hosting options. They have a variety of options to choose from, with VPS hosting starting at $39/mo, cloud hosting at $51/mo, and dedicated servers at $140/mo.

Liquid Web VPS Hosting

Liquid Web Cloud Hosting

Liquid Web Dedicated Servers

Which one is best for me?

If you aren’t sure, the managed hosting options from Nexcess will probably serve your needs very well. If you have a large site or need more flexibility than a managed hosting plan can offer, then you should get in touch with Liquid Web to discuss their VPS, cloud, and dedicated hosting options.

Managed Hosting vs VPS Hosting

Managed Hosting: The hosting company has many sites from different customers all running on the same server inside the same operating system, competing for the same resources. Think of it like sharing a house with roommates. Everyone shares the same kitchen, living room, and bathroom. If the same person spends four hours a day showering or fills the refrigerator with their groceries, you’re going to have a problem. Like landlords, some shared hosts are better about mitigating these issues, but you are still sharing a bathroom with many other people.

VPS & Cloud Hosting: Sites from different customers are still running on the same server, but on separate operating systems, in virtual computers. Another piece of software called a hypervisor makes sure that each operating system always has the same amount of resources available to it. Think of it like living in an apartment complex. You still have a lot of neighbors technically living in the same building, but no matter how many people are taking a shower at the same time, yours is always available.

Dedicated Hosting: You are renting out an entire server and are not sharing it with anyone. This is overkill for the vast majority of sites, but if you need complete control over your hosting environment, then renting a dedicated server is a good option.

Imports & Server Resources

Imports require a lot of server resources, especially if you are importing a lot of data or have a large database. Hosting review sites cover speed, reliability, and customer service but rarely let you know which hosts will throttle your processing power or limit your SQL queries.

Some hosts will pack many customers into small, underpowered, servers. Sites that consume a lot of resources will eat up all of the available processing power, leaving none for you and your import. Alternatively, some hosts will proactively kill your import process to protect other people’s sites.

We’ve tested a lot of hosts and out of all of them, Liquid Web and Nexcess are the two we’ve had the best experiences with. Both are fast, reliable, have well-reviewed 24/7 customer support, and work great with WP All Import.