How to Schedule WordPress Exports

How to Schedule WordPress Exports

WP All Export allows you to re-run an export automatically on a schedule. You may need to re-run an export when you have new data (such as orders, users, or comments), when you need to sync product stock data, or when you need to sync two sites together, etc.

WP All Export uses cron jobs to automate exports. You can manually create these cron jobs, or you can also use our Automatic Scheduling, which is a paid and optional service.

WP All Export can also use Zapier to connect with different applications and process exported data more efficiently. This integration comes built-in.

Automatic Scheduling Service

Optional paid service that's integrated directly within WP All Export and allows to easily schedule exports.

Manual Scheduling

Learn how to manually create the cron jobs required for exports to run on a schedule.

How to Export WooCommerce to CSV or XML

How to Export WooCommerce to CSV or XML

WP All Export exports WooCommerce data to CSV, Excel, or XML. You can export all your WooCommerce products or use filters to select a few. You can also export your WooCommerce orders, or get a list with all your customers.

You can export the existing reviews on your WooCommerce products or the WooCommerce coupons that exist on your site.

WP All Export can also create a Google Merchant Center Product Feed with all your WooCommerce products.

Export WooCommerce Products

Learn how to export WooCommerce products along with their specifications, images, custom fields, etc.

Export WooCommerce Orders

Create a WooCommerce orders report including the product and customer information.

Export WooCommerce Customers

Obtain a list of the customers that have purchased on your site.

Export WooCommerce Reviews

Export existing reviews made on your WooCommerce products.

Export WooCommerce Coupons

Export all data associated with the WooCommerce coupons existing on your site.

Export WooCommerce Products in a Google Merchant Center Product Feed

Export your WooCommerce Products in a friendly format for the Google Merchant Center.

Repeatable Groups

Repeatable Groups

Our Toolset Types Add-On provides multiple methods to import repeatable groups in an effort to accommodate as many file formats as possible.

Note: currently, we do not support appending repeater data from multiple import records into a single post. All of the repeating data for a single post needs to be in the same post record.

Fixed Repeater Mode

If you're using a CSV file with a fixed amount of columns for your repeating data, like this:

Toolset Types Fixed CSV Mode

Then you'd want to use "Fixed Repeater Mode" and add a row for each column that you plan on dragging in:

Toolset Types Add Row View

If it's possible that some of the columns won't have data for some records, you can enable the "Ignore blank fields" option to avoid adding empty rows.

Variable Repeater Mode (XML)

If you're importing an XML file and the repeating data is listed in sibling elements:

https://www.example.com/image1.jpg
https://www.example.com/image2.jpg
https://www.example.com/image3.jpg
https://www.example.com/image4.jpg
https://www.example.com/image5.jpg

Then you should use the Variable Repeater Mode (XML) option like this:

Toolset Types Variable Repeater Mode XML View

You'll notice that the syntax from the screenshot doesn't match what you'll see whenever you drag in the import elements. This is because you have to manually edit the XPath to make sure the loop is reaching the correct elements. You can learn more about this here in our Custom XPath and FOREACH Loops documentation pages.

Variable Repeater Mode (CSV)

If your repeating data is in a single CSV column with a delimiter, for example:

Toolset Types Variable Repeater Mode CSV View

Then you'll want to use the "Variable Repeater Mode (CSV)" option and make sure to choose the correct delimiter:

Toolset Types Variable Repeater Mode CSV Import View

Just like the "Fixed Repeater Mode", you can enable the "Ignore blank fields" option if some records have more or less repeating data.

Variable Number Of Images Per Host

Variable Number Of Images Per Host

Sometimes, each record in your XML or CSV file will have a different number of images associated with it. Here are some of the most common ways to handle this scenario with WP All Import.

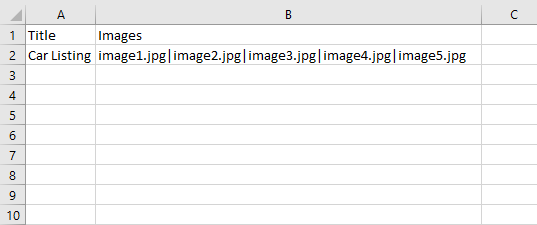
Option A: Image URLs Are Stored In A Single Column Or Element, And Separated By A Character

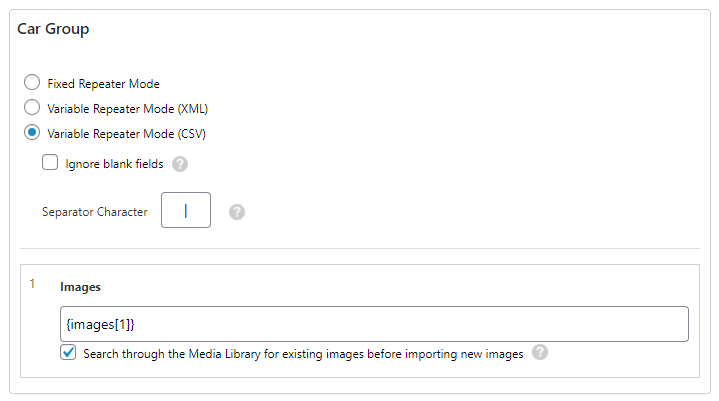
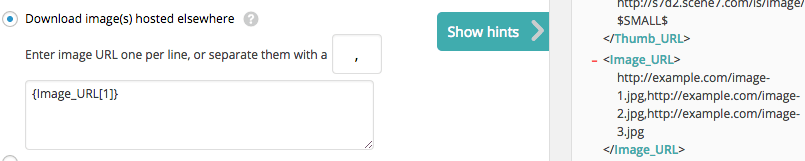
Simply drag & drop the column or element containing your image URLs or filenames to the appropriate textbox, and enter in the appropriate Separator character if it is different than a comma.

Drag and drop single element

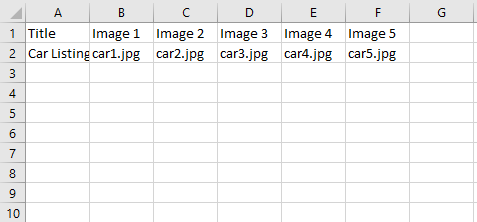
Option B: Image URLs are Contained In Different CSV Columns or XML Elements

WP All Import will ignore any blank image URLs, so you can simply specify all possible XPaths that could potentially point to image URLs for certain records. Any that don』t point to image URLs for the current record will be ignored for that record.

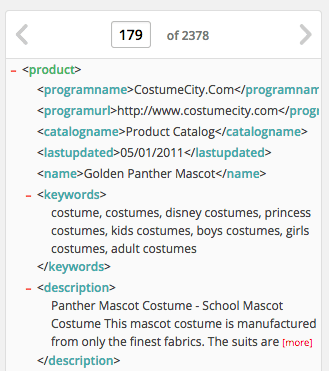
1. Go to the record in your XML or CSV file has the most images in the XML/CSV tree on the right, by entering in the record number and then clicking anywhere on the XML/CSV tree:

XML Tree View

2. Drag & drop all the elements or columns containing image URLs into the image URLs box.

Multiple image elements

Although you can』t see it in the screenshot, in our example, record 179 has 9 different images.

No other records have 9 different images, they have between 1 and 8. WP All Import will simply ignore {image_9[1]} when it doesn』t exist, {image_8[1]} when it doesn』t exist, etc.

Option C: Use an XPath query or a FOREACH Loop

If all your image URLs are stored as child elements of some parent element, you can use a FOREACH loop to loop through each child element.

This is only applicable to XML files.

Example XML:

Featured Image
Second Image
Third Image
Fourth Image

You can use this XPath query to output a comma delimited list of the image names:

{images/image/@src}

Or, if you need to prepend a URL, or add something else to the data, you can use a FOREACH loop instead:

[FOREACH({images/image})]http://www.example.com/my-folder/{@src},[ENDFOREACH]

More information on FOREACH loops.

How to Export WordPress Categories and Tags

How to Export WordPress Categories and Tags

WP All Export automatically detects all categories, tags, and taxonomies tied to the post type you are exporting. This includes WooCommerce product types, brands, real estate locations, and more.

You can choose to export them in one of two ways. First, you can export the taxonomies directly, and get a CSV or XML with category/tag in each row. Or, you can choose to export posts and include the taxonomies attached to them.

Direct Export of WordPress Taxonomies

Export WordPress categories and tags to a custom spreadsheet or XML feed. Here's an example of a simple direct export of WooCommerce product categories:

Category, Description
Winter, Clothing for cold weather.
Summer, Clothing for warm weather.
Mens, Men's clothing.
Womens, Women's clothing.

Export WordPress Posts with Taxonomies

Export any WordPress post type, along with their attached categories. Here's an example of a simple WooCommerce product export with their categories:

Product, Categories
Leather Jacket, Mens|Winter
Fur Coat, Womens|Winter
T-Shirt, Mens|Summer
Halter Top, Womens|Summer

Importing Images From Your Computer

Importing Images From Your Computer

If you have the images you wish to import on your computer/localhost, you』ll need to upload these images online first, before WP All Import can import them.

The easiest way to do this is create a folder on your website called 「images」, and then upload all the images to this folder – i.e. http://your-site.com/images/

Then follow the normal procedure for importing images from a URL.

If you have a .zip/.gz/.gzip file containing your XML and CSV file and all associated images, you can』t import this file directly – you need to first unzip it, get the images out, and upload them somewhere so that WP All Import can import them.

Meta Data

Meta Data

WP All Import can import image meta data from your file to WordPress. The possible meta fields are Title, Caption, Alt Text, and Description – as shown in the image below.

Image Meta Data Edit View

Image meta data can be imported in the SEO & Advanced Options sub-section of the Images section in WP All Import.

Meta data will be associated with images based on the order of the images and order of the meta data – for example, the first caption will be associated with the first image, the second caption will be associated with the second image, and so on.

Image Meta Data

How to Export WordPress to CSV, Excel, and XML

How to Export WordPress to CSV, Excel, and XML

To export WordPress data to CSV, Excel, or XML, go to WP All Export › New Export and select the type of data you'd like to export. Next, drag and drop the post data to set up your export file. Then run the export to create your customized WordPress export.

Step 1: Select a WordPress Post Type to Export

First, choose the type of data that you would like to export. WordPress separates data into different post types like posts, pages, WooCommerce products, real estate properties, etc. You can export any custom post type or taxonomy by selecting it here.

Step 2: Customize Your WordPress CSV/XML Export

The fields available to export are listed on the right. Drag and drop individual fields, or click Add All to export everything. Move export fields around to reorder the spreadsheet columns. Click to rename individual elements, combine multiple fields, and more.

Everything is available for export, including media, images, categories and tags, custom fields, etc. Things like WooCommerce, real estate plugins, Yoast, and ACF, have custom data that can be exported.

Drag and drop to set up your custom WordPress CSV/XML export.

Step 3: Confirm and Run Your Export

When you have finished selecting the data to export, click Continue to verify your export settings. Click Confirm & Run Export when you're ready to run your export.

Run your WordPress CSV/XML export.

Step 4: Download Your WordPress CSV/XML Export

After the export finishes, you'll be able to download the generated file. At this point you can choose to migrate this data to another WordPress install, edit it in Excel and import it back to this WordPress install, run this export on a schedule, or send the data to Dropbox, Google Drive, email, and over 1000+ other external apps via Zapier.

Click to download your WordPress CSV/XML export.

How To Export WooCommerce Coupons to CSV or XML

How To Export WooCommerce Coupons to CSV or XML

To export WooCommerce coupons, go to WP All Export › New Export and select WooCommerce Coupons. Next, drag and drop to customize your CSV/XML file with your coupon data. Then, run your export and download your file.

Drag and Drop to Export WooCommerce Coupons

Basic coupon data is in Available Data › Standard:

Coupon ID: The coupon ID, assigned by WordPress.Coupon Code: The coupon code itself, used by users to receive the discount.Coupon Description: A description of the coupon, written by the creator of the coupon.Discount Type: One of several preset values. Percentage discounts are exported as percent, fixed cart discounts as fixed_cart, and discounts on specific products as fixed_product.Coupon Amount: The amount to be discounted. Based on the discount type, this is either a percentage or a fixed amount.Expiry Date: Date when the coupon expires and is no longer available, in y-m-d format.Free Shipping: Whether this coupon grants free shipping or not, exports either yes or no. Exclude Sale Items: Whether this coupon works on sale items or not, exports either yes or no.

Other WooCommerce Coupon Data

Less used coupon data is in Available Data › Other. For example, who created the coupon, along with the following fields:

usage_limit: The total number of times the coupon can be used. usage_limit_per_user: The number of times each customer can use the coupon.limit_usage_to_x_items: The maximum number of items allowed in the cart when using the coupon.usage_count: The number of times the coupon has been used.minimum_amount: Minimum cart amount required to apply the coupon.maximum_amount: Maximum cart amount allowed to apply the coupon.

Overview

Overview

WP All Import provides a number of options for sideloading images to the posts it creates. Watch the video below for an overview of a few different ways to import images.

When creating a new import, you can specify the settings for importing your images in Step 3. To add images to an existing import, go to Manage Imports -> Edit Import.

For each record in your file, WP All Import will create a post, import the images associated with that record to the post』s Media Gallery, and optionally set the Featured Image.